

Signs of Premium Embroidery on Military Caps
Table of Contents
- Why Military Hat Embroidery Quality Matters
- Stitch Density and Consistency: The First Sign of Premium Embroidery
- Military Cap Insignia: Clarity, Color, and Placement
- Backing and the Hidden Back of the Embroidery
- Custom Embroidered Military Hats: Patches vs. Direct Embroidery
- Cap Construction and Fabric: What Premium Embroidery Needs to Last
- A Buyer's Inspection Checklist for Premium Embroidery
- Conclusion
- Frequently Asked Questions
Last Updated: October 19, 2026
Why Military Hat Embroidery Quality Matters
A military cap is not a costume piece. It carries a branch, a unit, a ship, or a period of service, and the embroidery is what makes that meaning visible. Premium embroidery is dense, even, cleanly outlined, and built to survive repeated wear and washing. Poor embroidery looks flat on day one and ragged by month three.
That matters because a cap is worn in public, often by someone who earned the right to wear it. Faded thread and loose stitches undercut the whole point.
Stitch Density and Consistency: The First Sign of Premium Embroidery
Stitch density is the number of stitches packed into a given area, and it is the fastest way to judge premium embroidery. Look for solid, tightly packed coverage with no fabric showing through the letters or shapes.
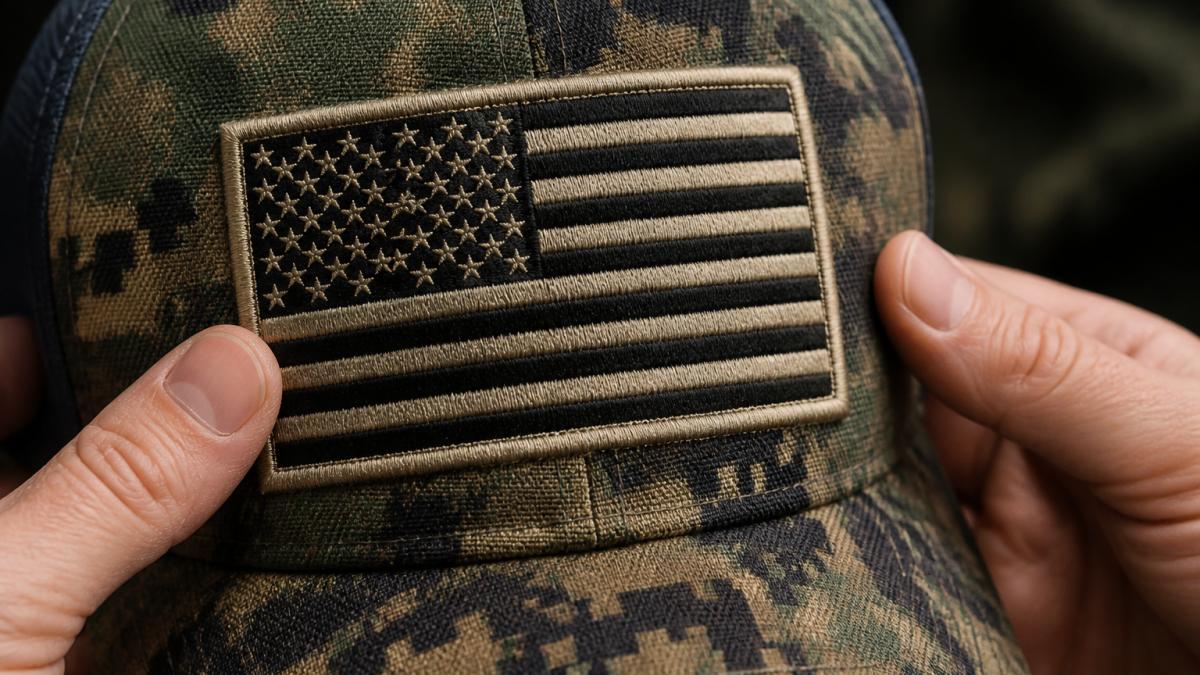
Consistency matters just as much. Run your eye along a border or a letter edge. Even spacing means a well-digitized design and a properly tensioned machine. Gaps, puckering, or wandering lines mean the opposite.
Here is what separates the two grades:
- Premium: dense coverage, crisp satin borders, no visible backing through the design
- Poor: thin lettering, loose stitches, fabric peeking through solid colors
- Premium: even stitch direction across the whole emblem
- Poor: distortion where curves and small details should be sharp
Military Cap Insignia: Clarity, Color, and Placement
Military cap insignia must be readable at arm's length and correct in placement. Branch emblems, rank references, and unit marks all depend on small details, and small details are where cheap embroidery fails first. Letters should be legible, shapes should close cleanly, and nothing should blur into a single mass.
Color contrast drives clarity. A light emblem on an olive or camouflage background needs enough thread weight to stand out. Solid colors should look solid, not streaky. Thread color should also match the official palette, not a rough approximation.
Placement Is a Construction Decision, Not a Style Choice
On a military cap, the front panel is rarely a flat canvas. It is usually two or more panels joined by a center seam, sometimes with a stiffener behind it. Premium embroidery is digitized around that seam, not across it. Look for these placement signals:
- Centered on the front panel, level with the brim. Measure from the brim edge to the bottom of the design on both sides; the margins should match within about 1/8 inch.
- Clear of the center seam. A well-digitized emblem either straddles the seam with a deliberate split or sits fully on one panel. Stitches that wander across the seam pucker within a few wears.
- Respectful of the crown curve. On a low-profile or unstructured cap, the design should sit lower and smaller; on a structured cap, it can ride higher and larger without distorting.
- Balanced side and back marks. Unit or branch marks on the side panels should be level with each other and aligned to the same baseline as the front emblem.
Off-center insignia is a manufacturing miss, not a style choice. So is an emblem that sits so high it collides with the button or so low it crowds the brim.
Authenticity and Respectful Use of Military Insignia
This is the check most buyers skip, and it is the one that matters most. Military insignia, branch emblems, unit crests, rank devices, and official seals, are not generic clip art. Before you buy or commission a cap:
- Confirm the source. A reputable maker can tell you where the emblem artwork came from and whether it is used with permission. If the seller cannot answer, treat the insignia as decorative rather than official.
- Distinguish commemorative from official. A cap that honors a branch or a period of service is not the same as a uniform item. Buyers should not represent a commemorative cap as authorized uniform wear.
- Check the details against a reference. Compare the emblem to a known official image. Premium embroidery reproduces the proportions, letter spacing, and color breaks of the real insignia; cheap embroidery simplifies or merges them.
- Avoid misleading combinations. Mixing a rank device with a branch emblem in a way that implies a rank the wearer did not hold is a respect problem, not just a design problem.
A cap that gets the insignia right, correct palette, correct proportions, correct placement, and a clear provenance, does more than look premium. It represents the branch the way the wearer intends.
Backing and the Hidden Back of the Embroidery
Flip the cap inside out. The backing tells you how the embroidery was built, and it is the check most buyers skip. A clean backing means the design was digitized with stability in mind. A messy one means corners were cut.
Look for these signs:
- A smooth, fused backing layer that supports the design
- No loose threads hanging inside the crown
- No stiff, scratchy patch of glue pressing against the forehead
- Even coverage behind dense areas, where stitches pull hardest
A padded sweatband helps here. It separates the backing from your skin and keeps the cap comfortable through a long day. Loose stitches on the inside usually become loose stitches on the outside within a few washes.
Custom Embroidered Military Hats: Patches vs. Direct Embroidery
Custom embroidered military hats generally use one of two methods: direct embroidery onto the cap, or a separate embroidered patch sewn or fused onto the front panel. Both can be premium. They fail in different ways, and the right choice depends on the design, the cap, and how the hat will be used.
How the Two Methods Differ
Direct embroidery stitches the design straight into the cap fabric. The thread sits flush with the panel and moves with it. It looks cleaner on curved front panels and holds fine detail well when the design is digitized properly.
Vietnam Veteran Flat Top Embroidered Cap →
Embroidered patches are stitched separately on a backing, then sewn or fused onto the cap. They add a raised, layered look and suit large crests and bold unit marks. The trade-off: a patch is only as good as its border and backing.
A Decision Framework for Buyers
Use these questions to choose:
- How small is the smallest detail? Fine lettering, thin script, and tight curves favor direct embroidery. Large, bold shapes with heavy outlines favor patches.
- How curved is the panel? Direct embroidery conforms to a curved front panel. A stiff patch on a curved panel can bridge or lift at the edges.
- How will the cap be worn and cleaned? A cap that sees repeated hand washing favors direct embroidery, which has no separate edge to lift. A display or ceremonial cap can carry a patch well.
- Is the design likely to change? A patch can be replaced; direct embroidery cannot. For a commemorative cap with a fixed design, direct embroidery is usually the cleaner long-term choice.
- What is the budget per unit? Patches often carry a separate setup and per-piece cost, while direct embroidery spreads digitizing across the run. Ask for both quotes against the same artwork before deciding.
What Premium Looks Like in Each Method
For direct embroidery, check the outer line of the design: there should be no fabric gaps, no puckering at the curves, and no thread breaks at the edges.
For a ship crest or a detailed emblem, direct embroidery usually keeps small details sharper. For a big, bold unit mark, a well-made patch can work well. Either way, the border is where quality shows first.
Cap Construction and Fabric: What Premium Embroidery Needs to Last
Embroidery is only as good as the cap underneath it. Cotton twill gives a stable surface that holds dense stitching without sagging. Polyester blends resist fading and hold shape through washing. Nylon performs well on performance-style caps.
Construction details that support longevity:
- Triple-stitched bill for a brim that keeps its curve
- Reinforced vent holes that do not tear at the edges
- Fully adjustable strap for a secure, even fit
- Padded sweatband to protect the backing and the wearer
A low-profile or washed cap changes the equation. Softer, unstructured fabric needs lighter, well-digitized designs, because heavy stitching on a soft crown causes distortion.
Our Vietnam Veteran Flat Top Embroidered Cap shows the standard we hold: high-definition direct embroidery on cotton twill, a triple-stitched bill, reinforced vent holes, and a padded sweatband. The US Air Force Cap with 3D Lettering Coyote Brown applies the same build to raised 3D lettering.


A Buyer's Inspection Checklist for Premium Embroidery
Use this checklist before you buy, and again when the cap arrives. It takes about two minutes and catches nearly every quality problem.
| Check | What Good Looks Like | Red Flag |
|---|---|---|
| Stitch density | Solid coverage, no fabric gaps | Thin letters, visible background |
| Stitch consistency | Even spacing and direction | Puckering, wandering lines |
| Logo clarity | Sharp edges, readable small text | Blurred or merged shapes |
| Thread color | Matches official palette, strong contrast | Streaky or washed-out color |
| Backing | Smooth, fused, no loose threads | Scratchy glue, hanging threads |
| Insignia placement | Centered and level with the brim | Off-center, uneven margins |
| Construction | Triple-stitched bill, reinforced vents | Fraying edges, weak brim |
| Fabric | Stable twill, polyester, or nylon | Thin fabric that sags |
Run the list in order. Density and consistency catch most problems, and the backing check catches the rest.
Durability testing at home is simple. Wear the cap, wash it by hand in cold water, and air dry it. Repeat a few times and watch the edges of the design. Premium embroidery holds its outline. Poor embroidery frays at the borders and fades within a season.
Conclusion
Spotting premium embroidery comes down to a few close looks: density, consistency, clarity, backing, and construction. A cap that passes all five will represent your branch the way it deserves. US Troop Gear, Inc. builds branch-specific caps with high-definition direct embroidery, triple-stitched bills, padded sweatbands, and reinforced vent holes, all designed to honor military heritage with respect. Browse our Middle East Veteran Embroidered Cap and the rest of our collection, and wear your pride with purpose.

Frequently Asked Questions
How can you tell if embroidery on a military cap is high quality?
Look at stitch density and consistency first. Premium embroidery has tight, uniform stitches with no gaps or loose threads, and the design edges are crisp. Check the back: a clean, finished backing with no loose threads or stiff glue patches signals quality. Also inspect the thread color for even coverage and confirm the insignia is centered and proportional. These signs of premium embroidery separate durable caps from ones that fray after a few washes.
What should the back of quality cap embroidery look like?
The back should be neat and covered with a soft backing material, not a stiff, scratchy patch of glue. Loose threads, long jumps between letters, and exposed bobbin thread are red flags. A clean back indicates the embroiderer took time to trim and finish the design, which affects comfort and longevity. On a premium cap, the backing also protects the stitching from friction against your head, reducing wear over time.
What is the difference between embroidered and printed military insignia?
Embroidered insignia uses thread stitched into the fabric, giving it texture, depth, and durability that resists fading and cracking. Printed insignia sits on the surface and can peel or fade after repeated washing. For military caps, embroidery is the traditional choice because it holds fine details like lettering and crests better. If you want a cap that lasts and looks authentic, choose direct embroidery over printing.
How do you care for an embroidered military cap?
Hand wash in cold water with mild detergent, then air dry. Avoid machine washing and high heat, which can shrink the fabric and loosen stitches. Use a soft brush to spot-clean stains, and never bleach. Store the cap in a cool, dry place away from direct sunlight to prevent fading. Proper care preserves stitch density and thread color, keeping the embroidery looking sharp for years.